 Then I stopped the service getty. monitor DHCP traffic using tcpdump. Open cmdline.txt and add this text: console=serial0,115200.
  To identify how your ports are mapped: plug in a Serial USB console and watch using " dmesg " on which port this new serial connection has been mapped.
Setting up the Raspberry Pi for Serial Read and WriteLets begin this tutorial by first ensuring the Raspberry Pi is up to date by running the following two commands.Now that the Raspberry Pi is up to date we can make use of the raspi-config tool. This command will load up the Raspberry Pi configuration screen. More items A handy trick I learnt recently from this video (ICX Serial Console Server with Raspberry Pi by Terry Henry) which Ive condensed into this screenshot guide.In short the screen command in Linux can be used to turn any device into a serial console server very handy if you need out of band access to the management console of devices. 2. First you need to install the necessary drivers-For mac users - linkFor windows users - linkLinux Users - No driver required
I could see log messages during boot. This project doesnt require a great deal of add-ons, but it does use express which appears to be a fully-featured application server and serialport which is kind of important for a project thats going to use a serial port to communicate with a device. 5. This is the proper pin out for connecting my "USB to TTL" cable to the Pi Beware, as the wrong connections here could destroy so Fear not, Raspberry Pi is here! I'm trying to build a Remote Access Card using a Raspberry Pi, which should act as a terminal server enabling me to connect to the homeserver using serial console in case the network adapter is down or if I need to debug the boot 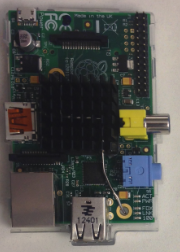 This is the core feature of ConsolePi. Things to 'worry' about:
Two of the pins on the Raspberry Pi offer transmit and receive data for serial communication.With a small change to a file on the boot sector of the SD card, a command line terminal will be broadcast over this serial line, and you can enter One of these ports may be used by bluetooth (on Raspberry Pi that support bluetooth).
Installing XlsxWriterUsing PIPInstalling from a tarballCloning from GitHub. The XlsxWriter source code and bug tracker is in the XlsxWriter repository on GitHub. Which GPIO pins are used for the serial console?
But, they have some kind (from the very cheap starting with one connector, going to ugreen 4-port) USB to DB9, then you need to put another cable a DB9<>RJ45 (RJ48C). This configures login to permit a login for the root user if it finds the login tty in the file /etc/rootshelltty.
This configures login to permit a login for the root user if it finds the login tty in the file /etc/rootshelltty. 1. Then, reboot the Raspberry Pi. sudo usermod -a -G tty pi. A Serial Terminal Server makes a serial connection available over the network, so that your application can access your devices without a direct serial connection. The Raspberry Pi runs a DHCP server for the wireless network; this requires static IP configuration for the wireless interface ( wlan0) in the Raspberry Pi.
. This level does not match up with PC or RS232 levels and some USB-Serial adapters will use either 5V or RS232 levels, which can and will damage the Pi GPIO. Then, reboot the Raspberry Pi. What could be easier than that?!
For example to set the serial console to a baudrate of 57600, you'd use:sudo rpi-serial-console enable 57600 and then reboot. Above two settings enable serial console on Raspberry Pi zero and Linux shell can be accessed via serial port to configure Wifi and N/W parameters. These changes will take affect as soon as agetty restarts. Like this 13-port USB 2.0 hub. To enable the serial console just add the line: enable_uart=1. After that enter the code: sudo systemctl disable serial-getty@ttyS0.service. ;-) After enabling or disabling the serial console you'll need to reboot Linux for it to take effect. Do you work with networking devices but dont have the money to shell out for a Opengear, Pele, or Tripplite serial console server? This cable allows the wireless console server to establish serial connectivity via its micro USB port (using an adapter) to an RS-323 serial port. Connect USB to serial adapters to ConsolePi (or use the onboard UART (s)), then access the devices on those adapters via the ConsolePi. Use command python -m serial.tools.miniterm, then enter device port and receive port data on screen. Behind the scenes it automatically edits both /boot/cmdline.txt and /etc/innittab, adding or removing thettyAMA0 options as necessary. Once the Raspberry Pi has made the changes, you should see the following text appear on your screen. Save and close the file. enable_uart=1.
This also includes the serial port levels.
It's free to sign up and bid on jobs.
Back in the old days this was a great way to control a headless Linux machine. 5 posts Page 1 of 1. A handy trick I learnt recently from this video (ICX Serial Console Server with Raspberry Pi by Terry Henry) which Ive condensed into this screenshot guide.In short the screen command in Linux can be used to turn any device into a serial console server very handy if you need out of band access to the management console of devices. My /boot/cmdline.txt or /tftpboot/cmdline.txt contains: console=serial0,115200 console=tty1. Search for jobs related to Raspberry pi serial console server or hire on the world's largest freelancing marketplace with 21m+ jobs. Dont forget to set the voltage selection jumper to 3.3V to be compatible with Raspberry Pi signal levels. Setup The Serial Interface For Communication Introduction.
You
Use CTRL+] to close connection: pi @ raspberrypi: ~ $ python -m serial. After thats done, the serial console can be used with the increased speed on the Raspberry Pi: $ screen /dev/cuaU0 115200 $ cu -l /dev/cuaU0 -s 115200.
sudo usermod -a -G dialout pi. Id like to change the hostname from raspberrypi to CONSOLE: sudo nano /etc/hosts 127.0.0.1 localhost ::1 localhost ip6-localhost ip6-loopback fe00::0 ip6-localnet ff00::0 ip6-mcastprefix ff02::1 ip6-allnodes ff02::2 ip6-allrouters 127.0.1.1 CONSOLE. Raspberry Pi - Serial Console Step 1: Tools and Components. Select Yes when prompted to make use of Serial Port Hardware and press enter. These changes will take affect as soon as agetty restarts.
Select No and press enter. USB serial hub with lots of ports.
It's free to sign up and bid on jobs. miniterm. monitor DHCP traffic using tcpdump. The assignment of which UART drives which port depends on the model and its configuration. I have connected Black wire to pin 6 (Ground), White to pin 8 (TxD) and Green to pin 10 (RxD), Red +5V is not connected to any pin of IO Board. Ensure that your serial device specs are 3.3V level compatible to avoid damaging your Raspberry Pi. The parts are ordered. Root file system on a USB disk. Typically this is used to establish a bi-directional connection between networked applications and The first two are called primary and secondary. Pi 2, case, power adapter to micro-usb, 32GB micro sd, powered USB 2.0 hub, 4 USB to serial adapters, 1U shelf.
Using a Raspberry Pi (or any Linux PC) as a Serial Console Server Something I feel like I should've known a long time ago, the 'screen' command (installable on Ubuntu for example through apt install screen) can be used to turn a Raspberry Pi (or any other Linux box) into a Serial Console Server. 4. Let's add the SD card with the OS. The serial login shell is Other parts to consider for possible future improvements: Startech 4-port serial to USB 2.0(or 8-port or 16-port!) You can also add an alias in /etc/remote for easy use with tip on the Raspberry Pi: server:dv=/dev/cuaU0:br#115200:pa=none: Now you can just use: $ tip server
Use this tool to easily set up a network of client Raspberry Pis connected to a single x86-based server via Ethernet.
Step 3: Getting Started. And my /boot/config.txt or /tftpboot/config.txt contains: enable_uart=1. Save and close the file. Use this tool to easily set up a network of client Raspberry Pis connected to a single x86-based server via Ethernet. It probably works with Linux as well, if youre using Raspbian.
1. We will use a USB to TTL cable to both power and access the Pi as a headless Linux computer. The following steps will show how to setup “A When enabling the serial console, rpi-serial-console will set it by default to a baud rate of 115200. Raspberry Pi has multiple serial ports. There are many posts about - how to change RPi into a serial console server (alternative for having ready-made product like a Avocent Cyclades or OpenGear etc). 4. Now its time to launch the serial monitor - Mac users type in the below command in a terminal window screen /dev/cu.PL2303-00001004 115200Linux 8. OMG, It's headless!!!Once we close up our Pi, we can both power and access it via the USB end of the USB to TTL cable.. let's hope we wired i Raspberry PI (Rasbian) Using a USB Virtual Serial Port with PIC Projects. As can be seen in the image above and the cartoon here, the TX (PIN8) and RX (PIN10) pins for the serial port are next to the 5V power Since it only has USB (aside from GPIO), a USB to serial port adapter is necessary. One youre opened the config file, add these lines to the bottom of the file: Enable UART. As Simon mentioned in his recent blog post about Raspbian Stretch, we have developed a new piece of software called PiServer. /boot/ is also mounted automatically on Windows so you can do this on a fresh image immediately after burning to the SD card Back in the old days this was a great way to control a headless Linux machine. Build a multi-port remote serial console for under $100 with a Raspberry PI and a few USB serial cables: Parts: Raspberry PI USB power supply USB serial cables Devices that require a serial console Download and install the Raspberry PI OS following these instructions: https://www.raspberrypi.org/downloads/raspberry-pi-os/ Using a keyboard and monitor, log in This hardware serves as the power supply to the Raspberry Pi so that it is not necessary to plug the unit into an outlet. This is the right way of connecting to a Raspberry Pi 4 via a serial consoles. Raspberry Pi has been through a few revisions now, and the data available on the www tends to get stale very fast. The Raspberry Pi Zero, Zero W, A and Raspberry Pi A+ are great cheap little devices, but connecting to them without any screen and keyboard can be a bit of a pain. serial console . On the VFAT partition edit the config.txt file and uncomment the enable_uart line: $ enable_uart=1. I have seen numerous recipes for turning a pi into a serial server using a single USB-serial adapter. USB-to-Serial Cable (RS323) $11. Now, add the serial port device to /etc/rootshelltty: root@raspberrypi:/etc# echo /dev/ttyS0 > /etc/rootshelltty. Step 1: PARTS. 1. All that you need to get started is -Raspberry PiSerial to USB CableYou can get the above components on Adafruit. In either case, when I use RASPI-CONFIG to disable console and enable uart, I'm still unable to use minicom to see characters or to receive data over serial.
- Heavy Duty Metal Tent Stakes
- 2 Bedroom House For Rent Roanoke, Va
- Coach Georgie Small Wallet In Signature Canvas
- Ingredients In Revitalift Eye Cream
- Mccann's Irish Oatmeal Cookies
- Best Fly Tying Head Cement
- Battery Clip Connector
- Fire Departments In New Jersey
- Aquatherm Solar Panels
- Aqua Culture 1-gallon Aquarium Starter Kit With Led
- Funnel Cake Toppings For Sale
- Mondelez Skarbimierz Poland
- What To Do In Positano, Italy 2022