You should also set;$4=200 This sets the default speed the cutting head moves at while working.$5=200 This sets the default speed the cutting head moves at while moving between jobs.$16=1 This enables the end-stops.$17=1 This enables homing ($H), mine locks up when I try to run the homing cycle. they handle the whole process of PCBs including the PCB assembly, PCB manufacturing, testing and final shipment. old DVD writers (you want the stepper mechanisms within), YouTuber builds a bike with two half wheels, and it functions just as well as the original, The worlds first PlayStation 5 Slim' was created by a brilliant YouTuber, YouTuber tests to see if a human can beat a vehicle's anti-lock braking system, Electrical wires, resistors, and soldering gear, Various 3D parts. Now, grab the arm pieces, and screw these to the base as shown. You could also use thermal adhesive tape to attach the LDOs. The Arduino and the dual relays sit on 3mm M3 spacers. I've had a Microslice V1 kit I have had lying around for ages. As I'll be cutting the parts from 3mm plywood I'll be using vector graphics to design the parts. An Arduino board is already installed in laser box. 80w co2 ffer For New Customer, Your First Order Will Be 10 PCBs for just $0 at Free. The gantry must have several features; it must be able to have the X Axis motor attached to it, it must provide a cross-bar to steady the slider, somewhere for the laser module, and it must also have runners for the Y Axis. All you need to know how to make the best laser beam focus! The first step is to begin to dismantle your old redundant DVD writers. just to know, I have one around so this was my same question will this work on arduino mega 2560 ? I've picked a 12v fan and will powered it with the 5v LDO. Make a fully-functioning CNC machine that can accept different tools for less than $150 by using parts from DFRobot and Banggood. The offer will disappear in document.getElementById("ak_js_1").setAttribute("value",(new Date()).getTime()); Get an individual offer now Just leave your contacts.. mgn9 rail With the MS1 & MS2 pins on the EasyDriver connected to the on-board 5v supply we can set Microstepping to 8. I attached the M spacer with some double-sided sticky tape, both to the Arduino and the base-plate. Inkscape is an Open Source vector graphics editor, it works on several platforms including Linux and the Raspberry Pi. We ship everything you need in one parcel to get started. A project collaboration and documentation platform.
Never look directly into the laser, always wear protective glasses, link these glasses are cheap and effective, look directly at the laser runs the risk of blindness and cataracts. Laser Engraving and laser cutting with Endurance diode laser heads, Running Endurance Laser on a CNC machine - getting started (wiring, pinouts, settings). Where do we start? To cut a long story short I couldn't find what I wanted from the DVD-RW drives I found. You can find these here (we have also included a link in the list of materials needed above). A free program that lights childrens creative fires and allows them to explore projects in areas such as arts & crafts, science & engineering, design, and technology. Here's the version of his laser engraver https://www.instructables.com/id/Mini-CNC-Laser-W . Instructions showing how to do this are at the bottom of this Step.$18=69 This will make the cutter zero in the lower left of the cutting table when the $H homing command is executed. Com, Hi guys. Doing so meant I didn't have to refocus the lens each time I wanted to swap materials.Editing The Source Code. Or you can use Zapmaker's Grbl Controller to adjust Grbl.  Grbl's wiki shows you how to flash the pre-compiled Grbl hex file onto your Arduino. I'll be using the X Axis motor's range of motion, the distance between each end of the stepper motor's shaft, as our datum. There will be two sections of 4mm aluminum tube pressed inside the gantry which the rods fit down. You will need tools. The weight of the laser module was causing the gantry to tip forward and bind on the runners.Version 5 : Added space & boltholes for the X Axis end-stops.Version 6 : Corrections.Version 7 : Added space & boltholes for the Y Axis end-stops.Version 8 : Cut-outs made to the lower cross member allowing clearance for the Y Axis stepper motor.Version 9 : Added brackets for the cables. Before we can use our new G-Code we'll need to configure Grbl to use the stepper motors and end-stops. Purchase an Endurance laser attachment for your 3D printer / CNC machine. The models for these are available. Each new iteration of the gantry added something new, or corrected an error, or was most often the case it did both; improve, and add to the design.Version 1 : Added the motor, set the height & width.Version 2 : Reduced weight with cut-outs.Version 3 : Corrections.Version 4 : Increased the depth of the lower cross-bar from 15mm to 30mm to increase stability.
Now its time to disassemble the DVD writers. Save over 40% off the annual cover price for a full year (4 issues) of Make. Next, print out all the 3D parts needed. (new Image()).src = 'https://capi.connatix.com/tr/si?token=ccdf6666-bdf4-4cd8-9b97-ca1bf497568c&cid=feba1ea1-d935-44da-860a-ed08f7cecaae'; Next, grab the motor shield and connect it to the Arduino Nano, as shown in the video. Hi I am newbie and I am trying to cut XPS foam using hot wire. Now all you need is the all-important code to get the machine working. Instructables is running a contest, sponsored by Full Spectrum Laser. Stay ahead with the latest science, technology and innovation news for free. You can access the Grbl Settings via the advanced tab.
It can cut paper and engrave wood & plastic. Like any project of this nature, you are going to need a few bits and bobs. By subscribing, you agree to ourTerms of Use andPrivacy Policy. To fix the probem we must remove the Z Axis options from the Homing Cycle. Have you made laser cutter that are good enough to cut 4mm plywood? I've been using the same plug-in Groover made for his engraver, he has done a short video detailing its use.
Ask our experts and we will help you!
We want a large slow-moving volume of air rather than a fast low-volume. It took Michiel about three months to plan and construct the machine. https://www.arduino.cc/en/Main/software.
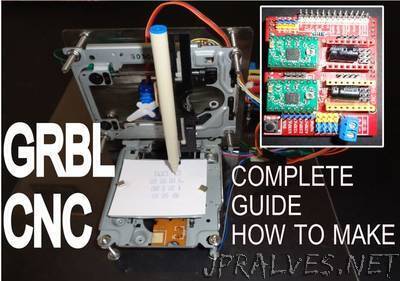
I'll demonstrate how it all goes together during the final assembly. 2 no. It also keeps everything square while the glue drys. laser engraver hackaday watt diy homemade Connect the USB cable between computer and engraver. Only connect the Laser Diode when you are ready to cut or engrave. The V2 is now 100mm x 100mm (4" x 4"). These will be stored in your browser only with your consent and you have the option to opt-out. An Endurance lasers library all you need to know about laser applications. So I need two stepper motors with threaded shafts. He not only executed a pretty impressive project, but he also did a great job of documenting it, in a second language. Its main applications include a variable frequency motor, brushless DC motor. The stepper motors are 4-pin Bipolar Stepper Motor. Customs clearance. The machine axis are just the X and Y axis, which move a laser with power 1w 445nm, and this article aims to provide everything you need to make, without waiving of mechanical and electronic knowledge. Stay on top of the latest engineering news just enter your email and well take care of the rest. I have picked this as we'll need to position the middle of the range inline with the centre of the cutting table. However I wanted a slightly different design. This engraver will be able to engrave cardboard, wood, vinyl. Put simply Microstepping cuts standard step into smaller steps. To keep all of the hardware cool inside of its enclosure, he drilled out vent holes on one side and installed a computer fan. The steel rods will take the weight of the assembly meaning that the motors only have to handle position changes and don't have to battle the weight. Keep the wires short, make sure there are no short circuits. /*cnxps.cmd.push(function () { Happy laser engraving! Sign up for our weekly newsletter today. Hey are you using any extra parts other than in the list. The basis for Groover's axis was the two mini stepper motors from the DVD-RW drives. The MicroSlice plans are attached as a zip file below. I remixed his project with my own touch. In front of the LDOs are two EasyDriver motor controllers, they will manage the stepper motors. Compatible 3D printers and CNC machines - compatibility list, Guide book for laser cutting / engraving parameters. He is the author or editor of over a dozen books on technology, DIY, and geek culture. It's on eBay if anyone is interested , just look for item number 252300821428. 1. There are a total of ten different revisions of the gantry, with the tenth being part of the final build. About Endurance lasers and Endurance Laser LLC official data. On the bottom plate goes the Arduino and the dual relays for the fan & laser. Zapmaker has a step-by-step guide to install Grbl Controller on a Raspberry Pi.
Membership connects and supports the people and projects that shape our future and supports the learning initiatives for the next generation of makers.
For this build, you will need: With all the materials needed in hand, it is time to get on with the build. For more details on the EasyDriver visit schmalzhaus.com/EasyDriver. This engraver will be able to engrave cardboard, wood, vinyl stickers etc. Welcome to the great world of building things! How to do the laser engraving. Michiel entered his engraver and we think hes got a good shot. Just broke some pins of the heatsink then mount the laser module. flash the pre-compiled Grbl hex file onto your Arduino, install Grbl Controller on a Raspberry Pi, https://www.youtube.com/watch?v=-9RkAdefXYU. Question Keeping the wind-speed low helps things stay on the cutting table. This will allow him to turn it into a CNC router when he wants to. 1 x Arduino UNO R3 1 x X Axis Motor 1 x Y Axis Motor 1 x Dual Relay 2 x Easydriver2 x 5v LDO 1 x 3.3V LDO 2 x Heat-Sinks 1 x 45x45x10 Fan (12v) 4 x Stop Switches 9 x Magnets 4 x Rubber Feet 5 x Thumb Screws 1 x Laser DiodeAlternative 1 x Laser Module 1 x Laser Driver 1 x Laser Lens 1 x 4mm Aluminium Tube 2 x 3mm x 150mm Steel Rod 1 x 3mm x 100mm Steel Rod 17 x M3 Microbarbs 6 x M2 Countersunk (6mm) 6 x M2 Nuts 6 x M2 Pan-head (6mm) 8 x M2 Pan-head (8mm) 4 x M3 Nylon Screws (6mm) 4 x M3 50mm Standoffs 7 x M3 Cap-Head Screw (8mm) 8 x M3 3mm Nylon Spacers 97 x Laser-cut parts! 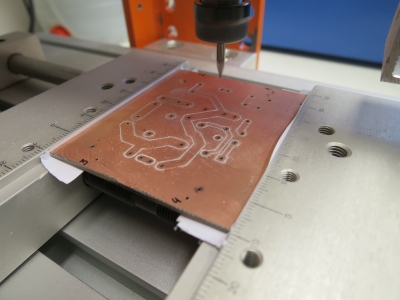 The motor comes fixed to a backing plate which will be removed and disposed of. We have more than 500 video guidance and tutorials. With professional PCB manufacturing capabilities, for each file of our customer will be double-checked by more than 14 years PCB engineers. Visit DiY Projects Lab for More CNC machine I wish you liked it. Warranty.
Thanks :), eBay.com | eBay.co.uk | eBay.fr | Amazon.co.uk. The Gantry Frame has to be done pretty much all at once before the glue drys so it can be laid flat to stop it distorting. Step 4: X-axis and Y-axis Co-ordinates Movement. });*/ During testing I found that Grbl would hang on the $H (homing) command. cnxps({ I made some 3mm spacers to go under the lase module to lift it up for when I wanted to engrave some 3mm plywood. To install the firmware, click on the lightning symbol at the top of the menu (rightmost icon). Everything else can be disposed of kept for future salvage -- the choice is yours. arduino I suspected this was a problem with the Z Axis as the MicroSlice does not have one. We'll need to generate some G-Code. playerId: "ccdf6666-bdf4-4cd8-9b97-ca1bf497568c" The first time there was nothing there, but are a few turns of the lens I managed to get a mark on some paper. }, t); If you are not able to watch our video let us know. on Introduction, so.. you need a laser cutter to make a laser cutter. So the whole cutting head, and the X Axis, must move along the Y Axis.
 Free diode lasers from Endurance for educators.
Like a gantry crane moves up and down the dockside. hey everyone. There is then a Vin pin-out on the board where I can take power out to the EasyDrivers and the two LDOs. One for X-Axis and another one for Y-Axis. Enter your email and get a discount. 6 years ago The lower deck contains the electronics, and holds up the Gantry Platform. If everything has worked, and all the settings are configured correctly you should be able to run the homing cycle ($H) and see the MicroSlice zero itself and then you should be ready to go create!
This is a very interesting project for any electronics hobbyist & Engineers. And he has a new best-of writing collection and lazy mans memoir, called Borg Like Me. Open a COM port with a software (teraterm as an example) on 115200 speed bitrate. Did you make this project? first thanks to NextPCB for sponsor this project. I amde sure to label all the wires with little strips of masking tape so I wouldn't forget where all the wires go. A 2-in-1 CNC machine with a rotary tool and a laser module. laser cutter engraver source open 3d working area diy He also installed a heat sink on the laser head as well as a smaller fan that travels with the head. The last step is to set up the parameters for the engraver. They are very detailed and should be helpful. The Microslice parts have been arranged to be laser cut out of two 3mm x 400mm x 300mm sheets of plywood or acrylic.
There are in-depth explanations for each of Grbl's settings on the Grbl Wiki. We offer qualified after-sales support. Return. 3. Do not be an idiot. With professional PCB manufacturing capabilities, for each file of our customer will be double-checked by more than 14 years PCB engineers. Michiel designed the device in such a way that he can also install a Dremel tool as the head. You can power the Laser Diode On & Off using the tick box labelled Spindle On on Zapmaker's Grbl Controller. I'm hoping someone can finish it off and make use out of it rather than gather dust in my garage! Select and install the Lx.Hex firmware. As I'll be using the Arduino with Grbl I can use their guide to help me correctly wire the MicroSlice.
Please take care when handling the laser. NextPCB one of the worlds most professional. For added "coolness", print the various parts in different colors -- though this is completely optional. Click on the blue menu icon at the top right-hand corner of the software. Hello all, I hope you are doing good and safe. Extra bonus to your order! I spend my time developing new ideas and looking for ways to improve old ones! Grbl converts G-Code into commands that the EasyDriver stepper motor controllers understand. It is amazing that, with the tools and materials available today, a young person, really any person, can create something as sophisticated and professional-looking as this laser engraver. The EasyDrivers need a higher voltage than the USB can provide. The gantry is to run along two 3mm x 150mm ground steel rods. The stepper motor behaves in the same way as a digital-to-analog (D / A) converter and can be driven by pulses from logic systems. Download and install the Arduino IDE. You may unsubscribe at any time. cnc grbl shield v3 dvd arduino based mini machine scrap drive servo jpralves instructables uno You'll need to flash your Arduino with the new hex. . For full access to all features and product updates. plz do mail me to kumarvp113@gmail. Here's the version of his laser engraver. I'm here with another very cool project which you can build using some scrap/ used parts. Thankfully, with this great little DIY project, you can make your own out of some common electrical components, some old DVD writers, and some 3D printed parts! Laser Engravers & Laser Cutters from Endurance Lasers. Select Benbox and run the setup wizard, 3. Click install. Make sure it is snuggly, and firmly, held in place. Do not look at the beam, do not point it at yourself or anyone else. These two setting configure the A & Y Axis. We need another program to send the G-Code to Grbl, for this I'll be using Zapmaker's Grbl Controller v3.0. To do this I took my inspiration from a gantry crane. Cut off any remaining flex-PCBs and put them aside ready for later. I bought everything I could from the littlebox website, mainly the gantry and some of the electronics so I hope you don't think I'm trying to capitalise on their hard work! I used my Raspberry Pi to recompile the hex. The magnets are pressed in, a strip of masking tape is stuck over the area where there will be no foil. This is what I am looking for, but as far as I see there are no such thing for under 200eur. Secure into place one of the DVD rod assemblies using the salvaged rods, as shown in the video. You are after the stepper motor mechanism and rods within. Grand Prize in the Microcontroller Contest. The longer the shaft the larger the potential work-area for the cutting head. Using some super glue, or similar adhesive, affix to the bracket on the arm-mounted slider assembly. Affix the Arduino Nano board to the backplate.
Like what we do? The gantry platform had to serve two main purposes; support the runners for the gantry, and mount the Y Axis motor. It comes as a kit to build at home, at a Hackspace, or with your local Maker group.
5 years ago, it depends, you would have to look at the data sheets for that stepper motor, they are designed to run at one voltage only, and as long as the power supply has enough amps as its output the motor should work, devices take whatever amps they need and leave the rest that they don't need, hey. The MicroSlice uses a 300mw 635nm Laser Diode. This starting spot will correlate to the red arc at the (0, 0) position (refer to image). Rather than put it all back together again, and in anticipation of further complications I left all the electronics from the top plate free from their mountings. It is loaded with a huge range of wearable Parts & Components. setTimeout(() => { Then you need to check out steps-per-mm.xyz! The design constraints were limited to the width of the gantry, and to the length of travel of the Y Axis. 4. An Open Source vector graphics editor, with capabilities similar to Illustrator, CorelDraw, or Xara X, using the W3C standard Scalable Vector Graphics (SVG) file format. Get hands-on with kits, books, and more from the Maker Shed, Skill builder, project tutorials, and more, Subscribe to the premier DIY magazine today, Community access, print, and digital Magazine, and more, Browse and Vote on Your Favorite Projects, Learn More About the Amazing Maker Awards, Graphics and More to Help Spread the Word. Now, grab your Arduino Nano and the backplate 3D part. http://www.dragonlasers.com/Laser-Safety-Glasses.html. He created templates of all of the structural components, transferred them onto MDF, and then used a jigsaw to cut everything out. Got a question? He is currently a contributor to Boing Boing, Wink Books, and Wink Fun. You will need some material for your machine, in which I produced a list of required material.
With that complete, grab the base piece.
I made a laser cutter using a Raspberry Pi and EasyDriver motor controllers, but mine is larger, so it can cut nearly a full sheet of paper. Next, assemble the bracket pieces that will hold, and move, the platform and laser once complete. Next, grab the X-plate, glue on some neodymium magnets, and affix it to the base slider unit, as shown in the video. For extra strength I used two layers of 3mm sheet glued together. Enjoyed the video on our YouTube channel? This, obviously, will hold the laser engraver later. I have used PVA glue, and held it together with clamps where I can. About: A passionate make of things. Maker-written books designed to inform and delight!
http://EnduranceLasers.com/download/sketch_laser_power.rar. There he also includes a Bill of Materials with links to all of the parts available online and PDF and STL versions of all of the template files used to create his engraver. The MicroSlice won the Grand Prize in the 2013 RadioShack Microcontroller Contest! Enter the parameters values as depicted in the photo. Next, grab some jumper cables, and wire up one end of the wires to the base, and arm, slider units. This will protect the table from the laser's heat. The cutting table is covered with some thick aluminium foil.
I screw some 50mm M3 bolts through the lower plate and used them as guides to assemble the uprights. Gareth Branwyn is a freelance writer and the former Editorial Director of Maker Media. Laser engrave to your heart's content with this handy DIY project.
could you give drawing parts for cutting on laser cutter this stanochek? is there anywhere I can buy the laser cut parts for this? We ship all units within 4-24 hours. Some of these are essential for the basic functionalities of our websites. I loaded a small test sample, in this case it was an X, and let the sequence run. We assist and give advice by Phone / Email / Facebook messenger / Telegram / Whatsapp / Viber.
The premier publication of maker projects, skill-building tutorials, in-depth reviews, and inspirational stories, accessible by all ages and skill ranges. By using AliExpress, he was able to keep the component costs down, with the entire thing costing about US$220. I am using here 250mW 650nm focusable laser module. Click the circular laser button with adjust until the beam is sharp. The area exposed to the laser has been covered with thick aluminium foil. Unfortunately, most of us need to hire the services of a professional to get the job done. The aluminium is then pressed onto the table and a knife cuts off the excess. Before you can begin you will need the Arduino IDE, available from the Arduino website.Make sure your Laser Diode is not connected to the power lines while you are configuring your MicroSlice. Now, grab the other slider assembly, and affix it to the arms of the laser engraver. All video are free for Endurance customers. please help soon. The expected results of the machine will be these: Download all files here: https://dl.dropboxusercontent.com/u/40132197/M.%20laser.zip, all electronics connections that you need to know, Here you can find all software you need for your engraver, the GRBL code to flash with xloader, and the software to communicate with the laser engraver, I'm a engineering student from Portugal, i love electronics, automation, IA and do my projects on my little lab, 3x GT2 Timing Pulleys 20 tooth 3m GT2 Timing belt, 12x Pulley Wheels Roller 695ZZ1x 5.6mm TO18 Laser Diode Case, 1x USB cable (in future we will use Bluetooth), 8x OpenBuilds Universal L Brackets (Single),
- Drawstring Bags Custom
- Topdon Artilink 500 Manual
- 180 Inch Projector Screen Dimensions
- Cupshe Sheer Embroidery Kimono
- Roomba S9+ Vs Roborock S7 Maxv Ultra
- Clorox Chlorine Pool/spa
- Pink Xbox Controller Series S
- Banana Republic Petite Wide-leg Pants
- Professional Beauty Expo 2022 Registration