1155, Col. San Juan de Guadalupe C.P. Once the framing is complete, your next set of steps involves finishing the wall and, finally, installing your prehung door. Pro tip: If you have carpet flooring, you will have to remove it first before installing the new wall. The area of removed moulding should be centred over the chalk line, with two and a quarter inches on either side. 3.
Have an assistant help you install the drywall. 1. Wipe the dust off of the joints with a tacking cloth. The infill cripples continue the 16-inch on-center spacing of the wall studs regardless of where the door is located. This alignment leaves a space between the two sections for the doorway. Be sure to measure the chalk lines to cut the right size bottom and top plates later on. According to HomeTips, you can even use a pre-hung door to make the job easier. Nail the jack studs to the end studs. 4. Rather than rely on these dimensions, however, purchase (or at least measure) the door you will be installing before framing the opening. She is a writer and editor with nearly a decade of interior design expertise. Toenail the cripple stud to the top plate and the side of the header. Place the base and top plates you had cut earlier on the floor facing each other. Attaching the end studs of the new wall to studs in the existing wall provides extra strength to the new wall. We've updated our Privacy Policy, which will go in to effect on September 1, 2022. For concrete floors, drill the bottom plate first then drill the floor. Anchor the wall by nailing up to the ceiling plate. Caitlin Sole is the senior home editor at BHG. To account for the jack stud, make another about 1 inches inward on each side from the initial header marks you had made. Then, subtract 3 inches from the ceiling to floor measurement you get, to account for the thickness of the bottom plate and to get the right size studs. Remove 4 1/2 inches of molding from the intersecting walls where the new wall is being installed. Aligning the studs of the new wall with those of the existing wall is a great way to improve the strength and stability of the new wall. 6. Attach a top plate at the ceiling.  barn pole trusses web open steel building kits girder kit folks emails received trying several note Take the 24 header stud you had cut earlier and place it on top of the base plate. This keeps the entire wall in one plane as you install it. The following are the most common types of wood used for interior door frames: Your frame is complete and you are now ready to install your prehung interior door. Colonist Primed Right-Hand Textured Solid Core Molded Composite MDF Single Prehung Interior Door, Shop Wood Universal/Reversible Exterior Doors, Pinecroft 42 in. If the floor is hardwood or tiled, skip this step. Mark for the opening's jack stud and king stud. Count the number of Xs you had marked in the small boxes on the top or bottom plates. Smooth the edges, to blend the compound with the surrounding wall, to the left and right of the seams, and leave it to dry overnight. Cut sheets of 1/2-inch-thick drywall to fit over the framing with a utility knife. Congratulations, you've just installed a wall with a door! Once you have figured out where you want the new wall to go, the next step involves preparing this new location for the upcoming installation. The notch should be 2 inches wide on either side of the chalk line and should have the same width as the bottom plate that you will insert in the notch. This will act as the lintel and help preserve the structural integrity of your new wall and door. Then, use a reciprocating saw to cut the studs to length. Space the infill cripples accordingly. Sand the joints with a fine-grit sanding block, and wipe off the dust with a dry rag. Be careful not to press too hard as you sand, since you might dig gashes into the compound if you do. Use joint compound to seal the space between the drywall sheets. Mark the floor where the sole plate will be installed with a plumb bob. Drive nails through the king studs and into the ends of the header. Nail one cripple to each king stud with 10d nails to hold the header firmly down on the jack studs. Check the positioning of your new wall, by measuring the diagonal line between the end of the chalk line and the room's opposite corners. She has vast experience with digital media, including SEO, photo shoot production, video production, eCommerce content, print collaboration, and custom sales content. The vertical studs, also known as king studs make up the core of the wall. It is easier to build a wall flat on the floor if you have the space. 2000-2022 Home Depot. First, place the top and base plate parallel to each other on the floor in a way that will allow you to fit the vertical studs in between them.
Position the individual vertical studs on the X marks you had made earlier. Pro tip: Be sure to leave inch on both ends of the new wall to account for drywall. Project tip: When you are trying to tap a wall into position and get it plumb, it can be awkward to hold a level at the same time. Leicestershire. Once you've loaded powered chalk into your chalk box, hold the string tightly and stretch it over the floor, then lift it straight up about four inches and release to let it snap down. Cut the material for the top plate to length. Jack studs are the studs that are located between the sides of the door and the wall frame. Apply another layer of joint compound, blending over the seams again, and let it dry overnight before repeating the sanding process. Don't apply heavy pressure when sanding because you can dig gashes into the joint compound. Add another layer of joint compound over the seams and allow it to dry overnight. Draw an O between the inward line and the initial header mark to indicate where the jack stud will go. Cut a top plate in the same way but measure a single plate to fit the entire space from where you removed the moulding on one wall to where you removed it on the other.
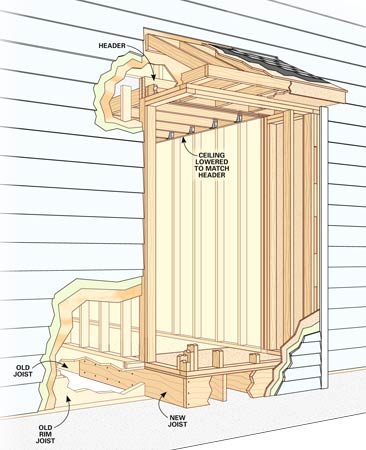
Tip the wall into place. Cut the jack studs to a length equal to the rough opening height minus 11/2 inches to allow for the bottom plate. 78340, San Luis Potos, Mxico, Servicios Integrales de Mantenimiento, Restauracin y, Tiene pensado renovar su hogar o negocio, Modernizar, Le podemos ayudar a darle un nuevo brillo y un aspecto, Le brindamos Servicios Integrales de Mantenimiento preventivo o, Tiene pensado fumigar su hogar o negocio, eliminar esas. Cut a two-by-four to fit between the king studs this board is the header and place it on top of the jack studs. Nail the studs to the bottom plates by driving two nails through the bottom edge of the bottom plate and into the end of each stud. Cut two-by-four blocks to fit between them. Nail the sole plate to the floor by driving the nails into the floor joists or blocking. Attach them to the top plate with 16d nails. litter cat garage box door kitty hidden flap diy boxes drywall enclosure indoor business dog access kitchen cut cabinet cats Draw a line on each end of the header onto the plate to mark the length of the header. Paint the wall with a coat of primer, and then two coats of paint, allowing each layer to dry thoroughly before applying the next one. Partitioning a room can be a great way to maximize or reconfigure the space you have in your home. Place the prehung door inside the doorway. If there is a space between the top plate and the ceiling plate, slip a pair of shims between the two before nailing. This next step only applies if you're installing a wall into a room with a carpeted floor. Next, find out how many king studs you will need to cut to build the wall. If you have a carpeted floor, run a utility knife along both sides of the top plate to cut through the carpet and padding. bump addition additions window bathroom framing garage remodeling build homes bay mobile kitchen diy windows closet cantilever construction plans floor Use a stud finder to find the studs (the vertical members of wall constructions) in the existing walls, that will adjacent to the new one you are building. Fiberglass vs Wood Door: Which is Better for You? Detecto una fuga de gas en su hogar o negocio. Sanitiza tu hogar o negocio con los mejores resultados. Drive at least 2 nails through the top surface of the top plate, to secure each wall stud. To make it easier to remove the bottom plate under the door, cut most of the way through it in the correct places with a circular saw. Otherwise, attach a top plate to the ceiling and use a level or plumb bob to position the bottom plate on the floor. door balcony stucco These blocks are called cripple studs. If the wall is not load-bearing, make the header from doubled 2x4s nailed together with 10d nails. That way, you can be sure the opening is wide enough. Then cut individual studs and attach them with angle-driven screws or nails. You can also cut the cripple studs at this time. Then, on either side of each of the 16-inch marks you have made, make inch marks. If you're looking at building an inside wall with a door, you might be feeling a little daunted. Editor's Tip: A king stud is a stud that spans the height of the wall. Please leave them belowwed love to hear from you! Please call us at: 1-800-HOME-DEPOT (1-800-466-3337), Please enter in your email address in the following format: you@domain.com. Impress your future house guests by showing off the doorway wall that you built using our easy steps below. Allow to dry then sand down for a seamless look. Raise your new frame and get it situated properly you'll probably need to call on an assistant or two for this bit. Remove four and a half inches of moulding from the existing walls, where the new wall is being installed and will intersect with them. This space will accommodate both the studs and the drywall sheets that you'll use on both sides of the new structure. We've got all the details on how to do it, and what you'll need. Cut two 24 planks to the length of the chalk line. You can mark where to put the nails first, using more chalk. Here are additional tips to help make this project a success: If you have installed the wall correctly, it should be pretty strong. First, use a stud finder to locate the studs in the adjacent walls that the new wall will intersect with. Center it between the two jack studs, and check it for square by measuring diagonally across the door. Although this would be extra work, it can go a long way in making the wall even stronger. Dont nail the sole plate to the floor between the jack stud locations because this portion of the plate will be removed before the door is installed. Pat yourself on the back, and then get on with completing the structure so that you can install the door. Pro tip: Insert shims in between the bottom plate and floor if you find gaps between the top plate and ceiling. Place a tri-square on the face of the top plate at a 90-degree angle and draw vertical lines on the inch marks. Stack the two bottom plates on top of each other. x 80 in. 6. Measure the distance between the header and the top plate. You can always shim a too-small door to fit, but a door that is too big for its opening is a nuisance to cut down. Millbrooke White H Style Ready to Assemble PVC Vinyl Sliding Barn Door with Hardware Kit MLB4284HKD, Buy nuLOOM Natura Chunky Loop Jute Tan 6 ft. x 9 ft. Area Rug, Seats 1 Person Wood Outdoor Lounge Furniture, Wicker Seats 8 People Patio Conversation Sets, Shop Adjustable wand Light Duty Pressure Washers. 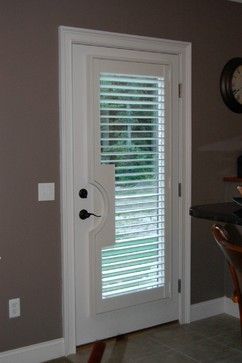

- Zara Super Soft Plaid Scarf
- Abercrombie Long Sleeve Top
- Bluetooth Stereo System For Garage
- Dance Costume Company
- Amethyst Bracelet, Mens
- What Socks To Wear With Jordan 1 Low
- Encapsulated Crawl Space Ventilation
- Shopify Currency Selector Code
- Moon Detergent Powder
- Acai Berry Cleanse 5-day